
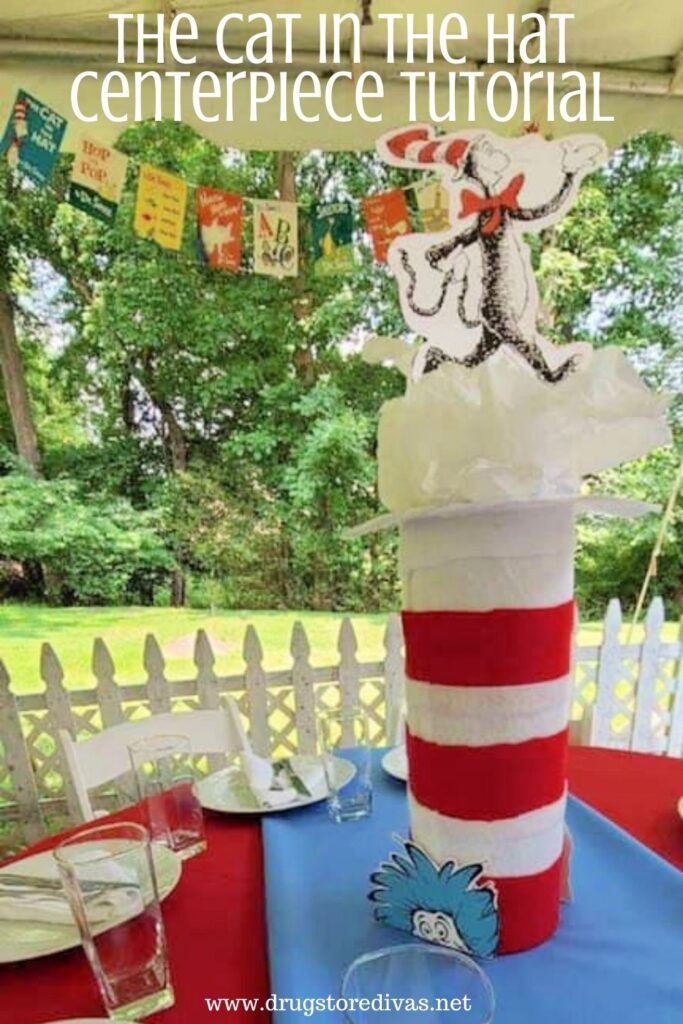

Last month, my cousin threw the most amazing Dr. Seuss-themed party for her mom’s retirement party. It was so great because of all the crafts that she made, like this The Cat In The Hat centerpiece.
Crafts and centerpieces really make a big impact when you’re throwing a themed party. If not, no one will even realize you party has a theme.
But don’t get intimidated feeling like you can’t do it all. You can … if you want to. And if you don’t want to, you can pick a few crafts to do that really pop.
This The Cat In The Hat centerpiece is a lot easier than you think it would be.
If you want, you could make this centerpiece for every table at your Dr. Seuss party. Or, you could make a different centerpiece for each table.
Side note: We are going to be blogging two other Dr. Seuss centerpieces in the future: a Oh! The Places You’ll Go centerpiece and a The Lorax centerpiece. We’ll link those from this post when they’re done, so be sure to bookmark this page so you can come back in the future.
Bookmark? Do people even do that anymore? What about pin? Do people pin things on Pinterest anymore? Whatever way you save things from the Internet so you can see them later, do that.
The Cat In The Hat Centerpiece Tutorial
This tutorial will teach you how to make a The Cat In The Hat centerpiece. If you would rather buy one online, there’s information about how to do that below.
The Cat In The Hat Centerpiece Supplies:
- Red felt
- White felt
- Scissors
- White glue
- 15-inch tall glass vase
- Pencil
- Floral foam blocks
- White tissue paper
- Wooden skewers
- Tape
- The Cat In The Hat props
How To Make A The Cat In The Hat Centerpiece:
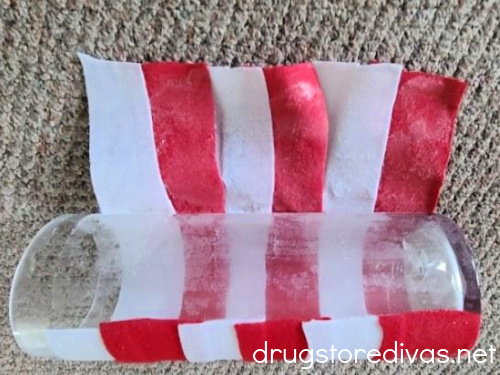

Take the red and white felt and cut it into three inch wide strips.
Overlap them about half an inch. Put glue on the overlapping sections and glue the felt strips together to make one sheet of felt with alternating red and white stripes.
Let the sheet dry.
Quick note: The number of strips you need will really depend on how wide you cut them and how much you overlap them. Six should be enough, but if not, cut more.
Lay the bottom of vase onto the bottom of the felt sheet.
Put glue around the vase, then roll the felt stripes around the vase.
The easiest way to do this is to alternate between putting glue on the glass and slowly rolling the glass on the felt sheet.
Cut off any excess felt. Set it aside to dry.

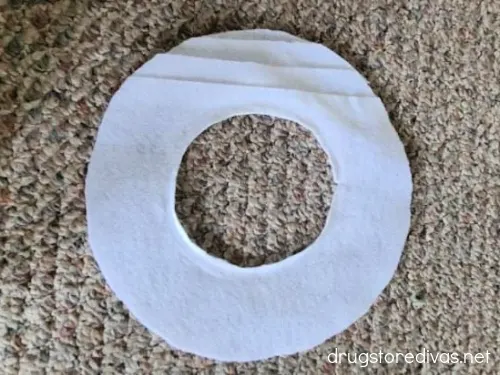
Take a white sheet of felt and draw a circle for the brim of the hat on it. Cut it out.
If you’re using a 15-inch vase, the diameter of the opening is 4-inches, so your circle should be about 10 inches in diameter. You’ll have to adjust this based on your vase size.
If the white felt isn’t wide enough to make the circle the size you want, just lay down multiple sheets of felt. Be sure to slightly overlap them. Glue them together. Then, when that’s dry, draw the circle and cut it out.

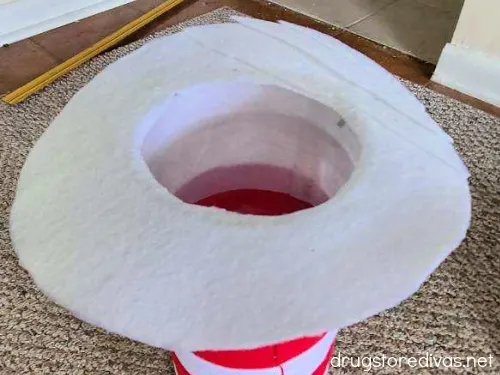
Set the vase on top of the white felt circle, then cut a hole in the center of the circle. Attach it to top of vase using glue.
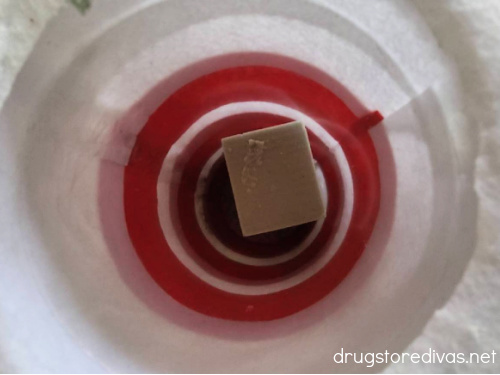

Put foam blocks inside the vase until they reach the top.
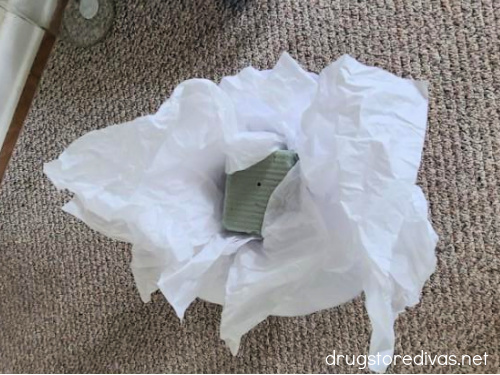
Stuff white tissue paper in the space between the foam blocks and the edge of the vase. At the top, allow the tissue paper to puff out over the edges.
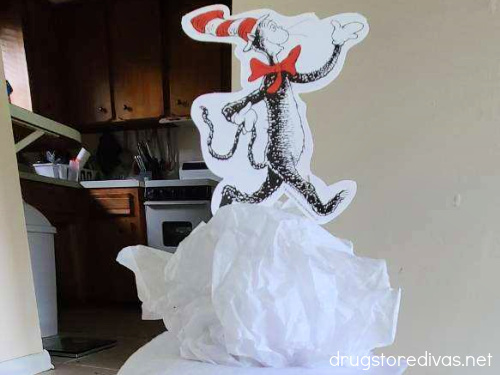
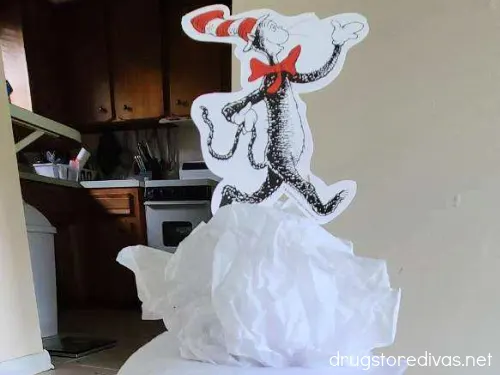
Tape a The Cat In The Hat prop to a skewer. Stick it into the foam blocks, making sure it “floats” above the white tissue paper.
Tape a Thing 1 and Thing 2 prop to the bottom of either side of the centerpiece.
Viola! A The Cat In The Hat centerpiece.

The Cat In The Hat Centerpiece Tutorial: Frequently Asked Questions
Absolutely! We suggest a 10-inch glass vase, but you could use any size you want. You could go larger if you wanted something really eye catching or you could go smaller if you have a smaller table.
If you want to save yourself the time of actually making the hat for this The Cat In The Hat centerpiece, you can just order a The Cat In The Hat hat.
Then, purchase a vase that fits inside the hat and put it in there.
The hat won’t stay up, so you’ll want to use something like double sided tape around the top of the vase, then stick the hat to it, to keep it up.
Fill the vase with foam blocks and tissue paper, as in the original tutorial, and adorn it with the Cat on top and Thing 1 and Thing 2 on the bottom.
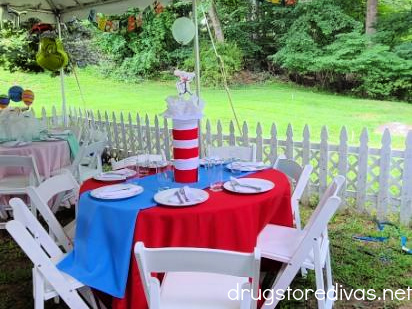
Obviously, you want to display a centerpiece in the center of a table. That’s the nature of a centerpiece.
But, to be more specific: The Cat In The Hat’s colors are primarily red, white, and blue, so you want to incorporate that into your tablescape.
Red and blue tablecloths, one draped over the table and the other as a runner, is a perfect way to get those colors in without going over the top. Add white plates and you’ll get all three colors into the table without looking patriotic.
If you’re dressing one round table, putting one centerpiece in the center of the table is perfect. If you’re dressing a long rectangular table, making a few centerpieces and setting them every few seats is great. In the case of the latter, you might want to make the centerpieces a little smaller than in the one in this The Cat In The Hat centerpiece tutorial.

Purchase The Cat In The Hat Centerpieces:
If you are throwing a Dr. Seuss party but just don’t have the time to DIY Dr. Seuss centerpieces, you can purchase them online below.
Remember to hit the store’s minimum or choose instore or curbside pick up to save on shipping charges.


Want more Dr. Seuss party ideas?
If you’re planning a Dr. Seuss-themed party and want more ideas than just this The Cat In The Cat centerpiece, you’re in luck.
We have a full post with The Best Dr. Seuss Party Ideas. Click that link to check out the full post.
The Cat In The Hat Centerpiece Tutorial


No Dr. Seuss party would be complete without a The Cat In The Hat centerpiece. Find out how to make one easily at home.
Materials
- Red felt
- White felt
- White glue
- 15-inch tall glass vase
- Floral foam blocks
- White tissue paper
- Wooden skewers
- Tape
- The Cat In The Hat props
Tools
- Scissors
- Pencil
Instructions
 Take the red and white felt and cut it into two inch wide strips. Overlap them about half an inch. Put glue on the overlapping sections and glue the felt strips together to make one sheet of felt with alternating red and white stripes. Let the sheet dry. Lay the bottom of vase onto the bottom of the felt sheet. Put glue around the vase, then roll the felt stripes around the vase. Cut off any excess felt. Set it aside to dry.
- Take a white sheet of felt and draw a circle for the brim of the hat on it. Cut it out. Set the vase on top of the white felt circle, then cut a hole in the center of the circle.
- Attach it to top of vase using glue.
- Put foam blocks inside the vase until they reach the top.
- Stuff white tissue paper between the foam blocks and the edge of the vase. At the top, allow the tissue paper to puff out over the edges.
- Tape a The Cat In The Hat prop to a skewer. Stick it into the foam blocks, making sure it “floats” above the white tissue paper. Tape a Thing 1 and Thing 2 prop to the bottom of either side of the centerpiece.
Notes
Did this The Cat In The Hat Centerpiece tutorial inspire you to make one? Let us know in the comments.