
If you’re planning a Winnie The Pooh baby shower or birthday party, this DIY Winnie the Pooh Hunny Pot would be the perfect centerpiece. It’s easy to make and will add a lot to your décor.
For more ideas of what to make, check out all of our DIY posts.


Themed parties are so much fun. They really let you lean into such fun food and decorations, so I’m a huge fan of them.
My cousin is too. If you’ve been around here a while, that’s the same cousin who planned a Dr. Seuss themed party and made the most incredible Dr. Seuss decorations for it.
She helped to throw a Winnie the Pooh themed baby shower and made an adorable DIY Winnie the Pooh Hunny Pot for each table.
If you’re throwing a Winnie the Pooh party or baby shower, you could make one for each table, like she did, or just one for the main table (the gift table, dessert table, food table, etc.). If you’re going to make one, you might as well make a dozen. But if you only want to make one, you can do that too.


If you’re making this because you’re hosting a baby shower, you might want to check out some of our other baby shower ideas, like our Safari Baby Shower Centerpieces Tutorial and our DIY Baby Blocks For A Baby Shower Tutorial (pictured above).
DIY Winnie the Pooh Hunny Pot
Affiliate links are included in this post and Drugstore Divas may make a small commission if you use them.
DIY Winnie the Pooh Hunny Pot Supplies:
You can get the full list of supplies in the how to card below.
- Round glass canister – If you can’t find one of those, you can use the same process on any glass jar (a mason jar, an upcycled marinara sauce jar if you’re on a budget, etc.).
- Alcohol wipe – This is to clean your jar to make sure there isn’t any dust on it.
- Paint brush
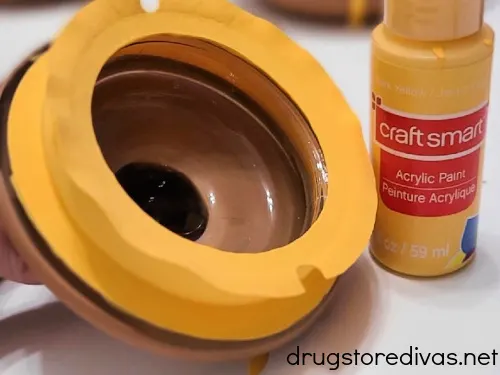
- Acrylic paint – You’ll need golden brown, earth brown, black, and yellow acrylic paint.
- Matte Clear Acrylic Coating – This gives the whole jar a dull coating.
- Glossy Mod Podge – This gives the honey a glossy/sticky look.
How To Make A DIY Winnie the Pooh Hunny Pot:
This step is optional, but we think you should opt in: Wipe your glass down with an alcohol wipe and dry it, making sure to remove any dust that could ruin the project.
The round glass canister in this post is full diameter: 6″, opening diameter: 3 5/8″, height: 9 9/16″, volume: 74 ounce. Of course, you can use any canister you find, but if you want an exact replica of this project, you’ll want the one we used.
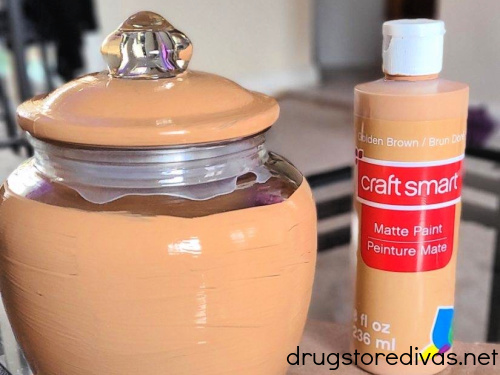
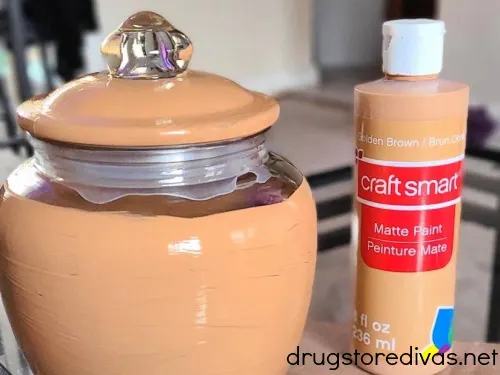
Start with the golden brown paint. Paint a layer of paint on the entire lid, including the underside of the lid’s lip. Don’t paint the handle or the portion of the lid that goes into the jar. Paint a layer of the golden brown paint on the bottom of the jar, up until the section where it concaves in.
Let the paint dry, then paint an additional two layers, letting the paint dry between.
Once the golden brown paint is completely dry, it’s time for the Earth brown paint.
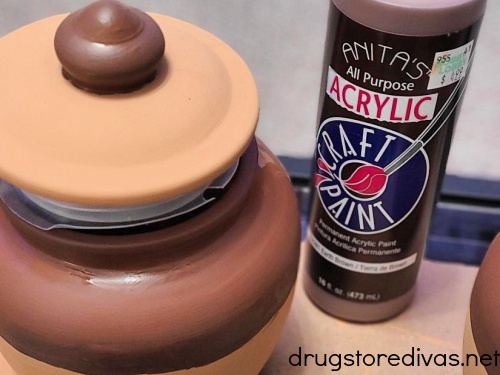
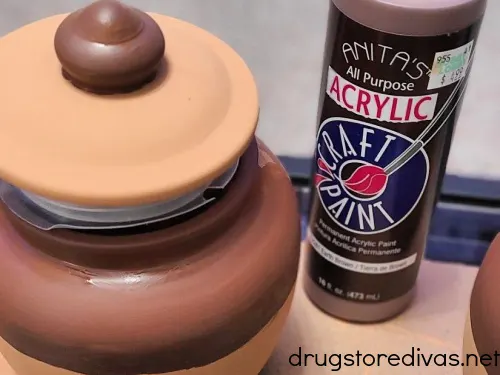
Paint a layer of Earth brown paint on the handle of the lid. Then, use it to paint the spot you left blank on the jar, including the lip of the jar. Continue to paint down about 1/3 of the way down the jar.
Where you stop on the jar doesn’t have to be exact. Just use your own judgement.
Once the Earth brown paint has dried, paint two additional layers of paint, letting it dry in between.
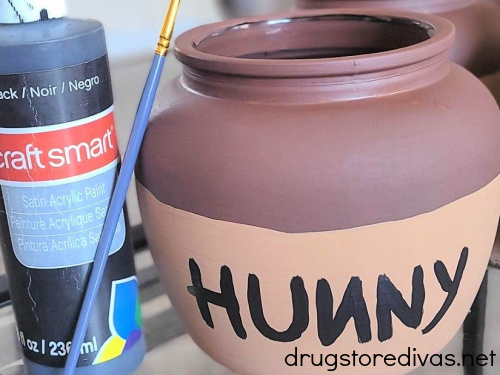

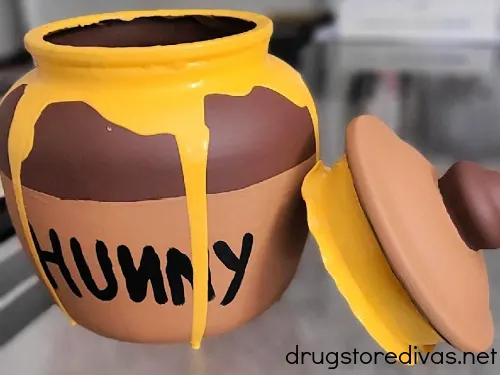
When the brown paints are completely dry, use a thin paintbrush to paint the word “HUИNY” on the golden brown portion of the jar.
Some Winnie the Pooh items are stylized with a backwards N and some aren’t, although (from what I can find online), it’s stylized with two correct facing N’s in the books. It look so much cuter with a backwards N, and will give a Mandela effect, so you paint it how you want.
When you’re painting the word, just be mindful of the size. You want the entire word to fit on the face of the jar. You don’t want it to wrap around. So, your best best is to start with the first N (the middle letter) and use that to space out the rest of the letters.
Let the black paint dry.
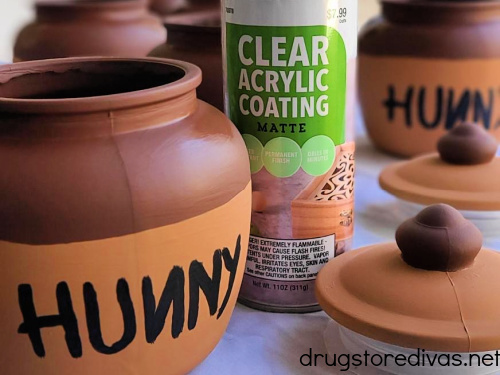

Spray the entire jar with a layer or Matte Clear Acrylic Coating.
Using matte won’t give the jar any shine, which is what you want. You’ll use a shiny gloss on the honey, which will help it to stand out.
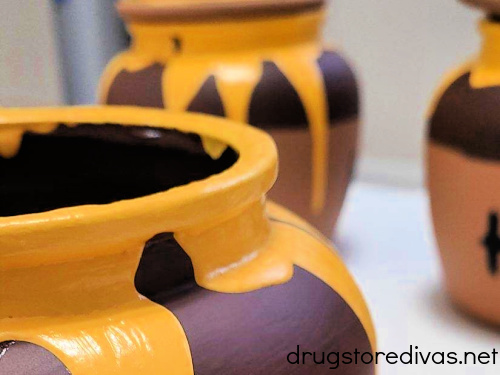
Now it’s time for the honey. This is the fun part and where, if you’re a perfectionist, you just need to let go.
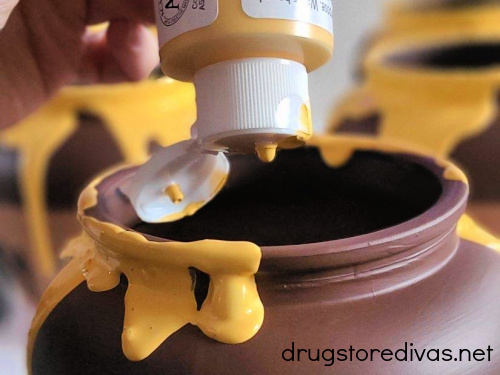
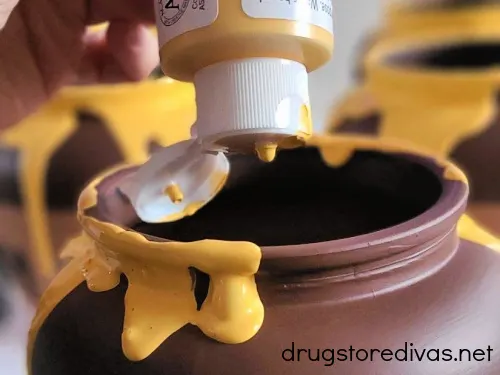
Take the yellow acrylic paint and squeeze it onto the jar to mimic the look of honey overflowing.
When you move around the jar, make sure you only squeeze hard in some spots, in order to get the drip overflow effect. If you do too much all over, it will just look messy.
Give the yellow paint time to drip down the jar, adding more where needed.

Paint the remaining part of the lid (the part that goes into the jar) yellow.
Remember to flip the lid upside down and paint the underside as well.

In order to give all the yellow “honey” its shininess, wait for the yellow paint to dry completely, then hand paint glossy Mod Podge over the yellow parts.
Let the Mod Podge dry completely and you’re ready to display your honey pots.

DIY Winnie The Pooh Hunny Pot: Frequently Asked Questions
Of course you can. If you can’t find this exact jar, just pick one that’s a similar shape.
Of course, if you use a different jar with a different lid, it’ll look different, but you have to do whatever you think is best.
The colors in this tutorial are mimicking the colors used in the Winnie The Pooh books and cartoons. If you have a specific color scheme for your Winnie The Pooh party, you can paint the honey pots that color instead.
If you love these Winnie The Pooh honey pots, but you just don’t have the effort to actually make them yourself, we found similar ones that you can purchase online at the following stores: Amazon, Etsy, and Shop Disney. Remember to check a store’s minimum cart total to qualify for free shipping.
DIY Winnie The Pooh Hunny Pot


If you’re planning a Winnie The Pooh baby shower or birthday party, this DIY Winnie the Pooh Hunny Pot would be the perfect centerpiece. It’s easy to make and will add a lot to your décor.
Materials
- Round glass canister (74 ounce)
- Alcohol wipe
- Golden brown acrylic paint
- Earth brown acrylic paint
- Black acrylic paint
- Matte Clear Acrylic Coating
- Yellow acrylic paint
- Glossy Mod Podge
Tools
- Paint brush
Instructions
 Start with the golden brown paint. Paint a layer of paint on the entire lid, including the underside of the lid’s lip. Don’t paint the handle or the portion of the lid that goes into the jar. Paint a layer of the golden brown paint on the bottom of the jar, up until the section where it concaves in. Let the paint dry, then paint an additional two layers, letting the paint dry between.
- Paint a layer of Earth brown paint on the handle of the lid. Then, use it to paint the spot you left blank on the jar, including the lip of the jar. Continue to paint down about 1/3 of the way down the jar. Once the Earth brown paint has dried, paint two additional layers of paint, letting it dry in between.
- When the brown paints are completely dry, use a thin paintbrush to paint the word “HUИNY” on the golden brown portion of the jar. Let the black paint dry.
- Spray the entire jar with a layer or Matte Clear Acrylic Coating.
- Now it’s time for the honey. Take the yellow acrylic paint and squeeze it onto the jar to mimic the look of honey overflowing. Give the yellow paint time to drip down the jar, adding more where needed.
- Paint the remaining part of the lid (the part that goes into the jar) yellow. Remember to flip the lid upside down and paint the underside as well.
- Hand paint glossy Mod Podge over the yellow parts.
Notes
When you're dripping the yellow paint for the honey, make sure you only squeeze hard in some spots, in order to get the drip overflow effect. If you do too much all over, it will just look messy.
Did you make these DIY Winnie the Pooh Hunny Pots? Let us know how it went.
Tracy
Thursday 19th of February 2026
Hi, it looks like mod podge comes in different colours. Is that correct? If yes, which one should I get? Thanks.
Lisa
Friday 20th of February 2026
Mod Podge only comes in clear. It comes in different finishes, though, like matte, gloss, dishwasher-safe, etc. You want the Gloss for this project.
Janelle
Tuesday 25th of March 2025
So cute! Could you tell me where you got the jar to make this? I can’t seem to find this one myself.
Lisa
Tuesday 25th of March 2025
It's from Hobby Lobby.
Hannah
Sunday 16th of March 2025
Hello! I love DIY, but I am trying to lessen my load for my daughter's 2nd birthday. Would you be open to making a "Hunny" pot for me and shipping it? I live in California, and her birthday party is at the end of March.
I want to use the jar as a "spilled" hunny pot on top of her cake.
Thank you for your time and consideration.
Blessings, Hannah
Lisa
Sunday 16th of March 2025
Hey Hannah. I just sent you an email.
Jenny
Thursday 27th of February 2025
This is super cute. Is the matte clear coating spray necessary?
Lisa
Thursday 27th of February 2025
It's a finishing spray that covers any imperfections. So it really hides all your brush strokes. Plus, spraying it with a matte allows the shiny "honey" to really stand out, giving your jars such a great contrast.
Carol
Wednesday 17th of August 2022
This is so cute and so perfect!