
This DIY Raised Garden Bed post is sponsored.


When we lived in our apartment, we lived on the third floor of the building. We had a beautiful porch that got really nice sunlight. Plus, we lived on the corner of the building, so we were able to get sun from two sides. It was the perfect spot for a container garden. But when we moved to our house, we wanted to expand. So Pete made a DIY Raised Garden Bed for me.
We actually have two raised garden beds now — a large rectangular raised garden bed and a smaller square raised garden bed.
The square is just for our tomatoes to keep them from taking over the rest of our garden. The rectangle raised garden bed is where we put peppers, kale, eggplant, etc. It’s perfect for vegetables that grow up, not out. It wouldn’t be ideal for a vegetable that grows on a vine, like squash.
We did also grow herbs in our raised garden bed, and the oregano completely took over a large portion of the box. Strawberries will do that as well. Given the room, herbs and berries (and certain flowers like Mexican petunias) will just grow out of control.
DIY Raised Garden Bed
What You’ll Need:
- 6 60-inch 2×4 boards of cedar lumber
- 6 35-inch 2×4 boards of cedar lumber
- 4 12-inch 4×4 boards of cedar lumber
- 72 3-inch #8 deck screws
- Cordless drill
- Hammer
- Table saw, optional
What You’ll Do:
Go to the hardware store and pick up your wood. Make sure you are buying cedar lumber, not pressure treated lumber. It’s not safe to use treated lumber to grow vegetables.
If you have a table saw at home, you can bring home the gigantic pieces that the hardware store sells and cut them to size at home.
If you don’t have a table saw (or the desire to cut wood), the hardware store will actually cut it down to size for you. It’s easier to put drive it home that way too.
The 4×4 pieces are going to be your posts. The 2×4 boards will be your sides. We’ll be referring to these as posts, longer sides, and shorter sides from now on, just to make it a little easier.

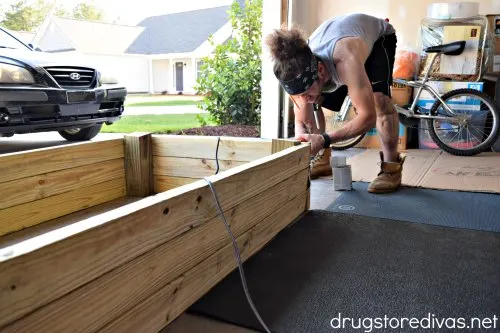
Start with your post.
Take a longer side, make it flush with the bottom and one end of the post, then use the drill to screw in two deck screws, vertically and equally spaced.
At the other end of long side, place another post. Again, make that post flush with the end of the long side, and screw in two deck screws.
Repeat those last two steps to make the second side. Set those two sides 35 inches apart.
Place the shorter side between the two longer sides. The shorter side should be flush with the longer sides and posts.
On both sides, screw two deck screws where the two sides meet, then another two where the shorter side and post meet (for a total of eight screws).
Repeat on the opposite side so now you have four sides.
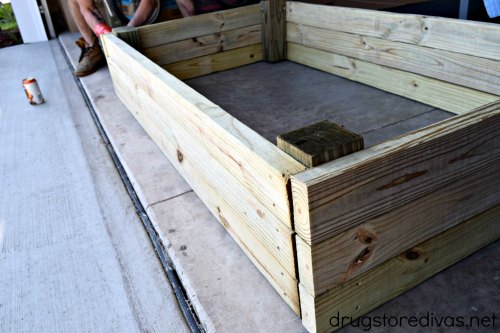

Add two more rows of side pieces so each side becomes three boards of wood high.
Don’t worry that there is an inch and a half extra on the posts. You need that.
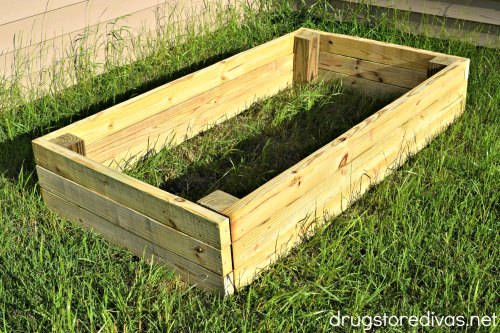
Take the raised garden bed outside and flip it over, so the extra pieces of post go into the ground. That will make it stay put.
Use the hammer to gently tap the posts into the ground to secure the raised garden bed.
Fill with potting soil (to yield the best results) or dirt.
We used seven large bags of potting soil to fill the raised garden bed initially. We did fill it to the top, but rain and the elements will pack it down.
Every year, remove any roots left behind by dead plants, pull any weeds that have grown, and add additional bags of potting soil as needed.

Benefits of raised garden bed
We love our raised garden bed. Pete actually spent time this summer extending ours because I love it so much.
There are a lot of benefits of raised garden beds that in-ground gardens don’t have. I listed my top five.
1. Longer growing season
From a few years of trial and error, I realized the earlier I can get seeds and seedlings into my garden, the better the turnout of the garden overall. If I can start the last week of March or the first week of April, I have so many more crops than if I start the first week of May.
With a raised garden bed, the soil is warmer sooner because it doesn’t have the ground to cool it down as much. So you can plant sooner — and keep the plants longer. Your growing season is longer, which means your garden should yield more crop.
2. Less foot traffic
The chances that someone will walk in your garden and trample your plants is a lot less with a raised garden bed versus an in-ground garden. And honestly, either way, people shouldn’t be having dance parties in your garden. Although, as I typed that, I want you to invite me to your garden party.
Walking in the garden means you have a chance of stepping on plants, yes, but it’s more about the fact that your footsteps are compacting the soil. It’s harder for plant roots to grow in compacted soil, and harder for plants to sprout through it.
3. Less weeds
If you guys know me in real life, you know I’m in a battle against the clovers in our backyard. I’m determined to win, but the clovers are putting up a good fight. Our clovers are weeds, and grow like weeds, and take up so much of our lawn.
The good thing about our raised garden bed is that there are less weeds. There are still some weeds in ours that sneak through, but for the most part, there aren’t any. In my parents’ in ground garden, there are so many weeds because the soil is at ground level. There’s no barrier for the weeds to grow through.
4. You use less water
When you water a raised garden bed, the water gets into the soil and is retained better. The water only gets redistributed to your raised garden bed. Same goes with things like plant food.
When you have an in ground garden, so much of the water and nutrients are distributed to the rest of the ground. So you have to use more water and food to accomplish the same amount of benefit. In the long run, that will cost you more.
5. Less chance of flooding
We get so much rain here in North Carolina. We had a hurricane earlier in the week, which brought so much rain, and then a flash flooding warning yesterday. So you can only imagine how much water that brings to the garden. When it rains, I always say, “At least it’s good for the plants.” But sometimes, it rains for weeks at a time, and that’s not good for the plants.
Except in a raised bed garden, it’s not as bad. The water gets distributed in the soil easier, meaning there’s less chance of the water puddling and flooding out your crops. In an in ground garden (or even in shallow containers used in container gardening), you have a higher chance of flooding out your crops, even with proper drainage.
Looking for more gardening tips?
– How To Grow Potatoes
– How To Prune Your Garden
– Tomato Caterpillars: What The Are And How To Get Rid Of Them
Rebecca Payne
Friday 7th of August 2020
So creative. Thank you for sharing.