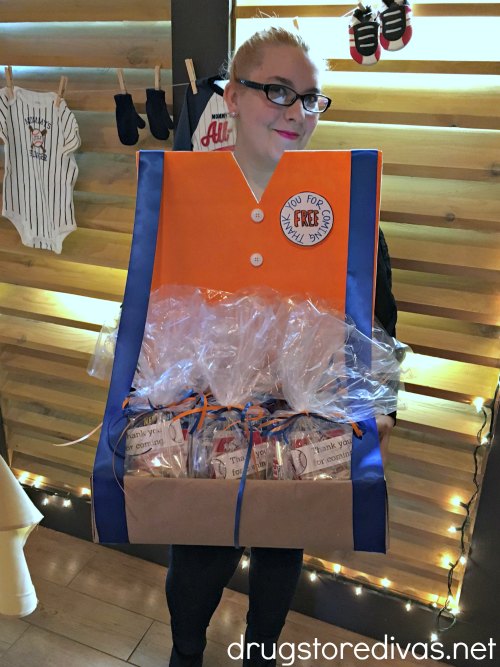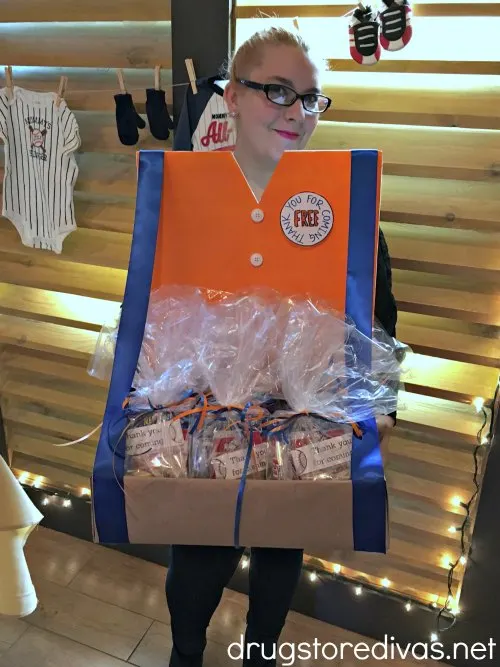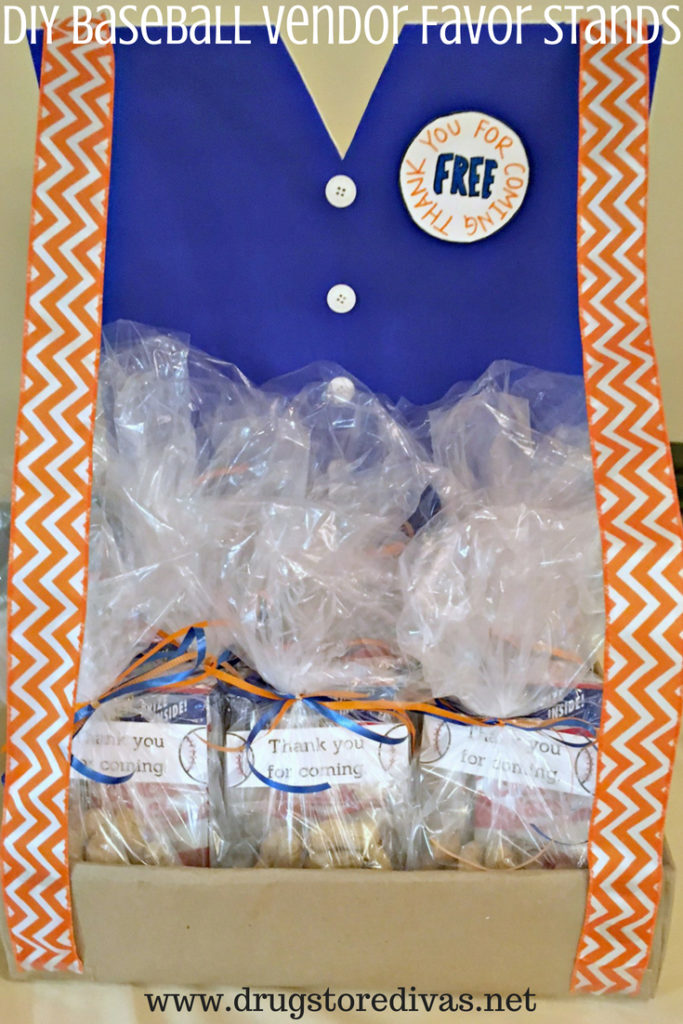
 My brother’s wife’s baby shower was baseball themed, so we were trying to brainstorm favor ideas. We decided peanuts, Cracker Jacks, and a Baby Ruth candy bar were perfect. My mom had a great idea to make DIY Baseball Vendor Favor Stands to hold the favors.
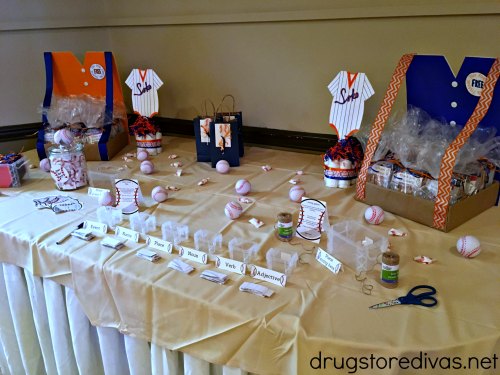
If you’ve been to a baseball game, you know that the vendors wear a box around their necks, and that box holds the treats they’re selling.
Each vendor also has a large pin with the name of the treat around the outside and the price in the center.
This is what we were trying to replicate.
We used blue and orange because of the New York Mets, but you could change this to any colors you want.
DIY Baseball Vendor Favor Stands
What You’ll Need:
- 2 pieces of foam board
- Xacto knife
- Pencil
- Ruler
- Orange 2-inch ribbon
- Blue 2-inch ribbon
- Orange acrylic paint
- Blue acrylic paint
- Foam paint brushes
- Glue gun and hot glue sticks
- Buttons
- 2 large boxes
- Brown drawing paper
- White card stock
- Blue marker
- Orange marker
- Wine glass
- Water glass/flute

What You’ll Do:
Using the Xacto knife, cut a triangle from the top center of both of the foam boards. This will be the v-neck of the shirt. Save the triangle. We will use a piece of it later.
Using a foam brush, paint one of the boards orange and the other side blue. You’ll want to paint both sides and they may require multiple coats of paint depending on the colors you choose.
Wrap the boxes in brown drawing paper. This is really necessary if you are reusing any old boxes. Those will most likely have writing on the outside of them, so you want the brown paper to cover it.
The easiest way I can tell you to do this is a little hard to describe. So bear with me.
Cut off the top of the box, leaving only the bottom and four sides.
Cut a piece of drawing paper, just about double the size of the box. Put the box in the center of that paper. Fold it up on parallel sides. Where the paper hits the corners, you’ll want to cut a straight line from the edge of the paper to the box. That should give you four flaps.
Fold and glue down two sides of flaps. Before you glue the sides down, make sure they are as tight against the box as possible. You’ll also want to glue it to the bottom of the box as well.
Do this with the other sides.
When you’re done, you’ll have the entire bottom outside, bottom inside, and sides of the box covered in paper.
Pat yourself on the back, then move on.
When the paint has dried on the foam board, glue the box against the bottom of the foam board. I suggest using either a glue gun or E600 glue. Regular white glue won’t hold this well enough.
Note how much space you have between the bottom of the v and the top of the box. Glue four buttons down evenly in that space.
Cut two pieces of ribbon (per vendor) and glue them from the back of each “shoulder” to the bottom of the box. You want them to be loose, but not too loose.
Now it’s time to make the button.
Use the wine glass to measure a perfect circle on a piece of white card stock. Cut it out. Use the water glass/flute to measure a smaller circle in the center. Write the word “FREE” in the smaller circle. Then, write “Thank You For Coming” in the outer circle. I lightly wrote everything in pencil at first, then colored over it with blue and orange markers.
Cut a chunk of foam board from that extra v you saved. Glue it to the center (in the back) of the button. Then, glue it to the upper “breast” of the vendor.
Let everything dry completely before filling it with your goody bags (even as a test).